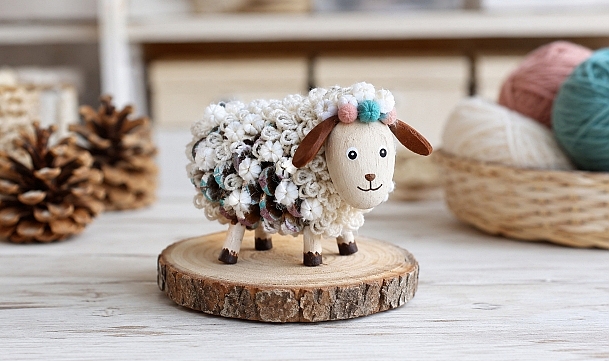
How to Make an Adorable Pine Cone Sheep
This little sheep is made from a pine cone, white wool, painted wooden pieces, and a few colorful pom-poms. It makes a charming decoration for a shelf, mantel, spring display, or woodland-themed arrangement.
Skill level: Beginner
Active time: 45–60 minutes
Finished size: Approximately 4–5 inches long
Supplies
- 1 medium pine cone, approximately 3–4 inches long
- White mini pom-poms, felt balls, or thick white yarn
- 1 oval wooden piece for the face
- 2 narrow oval wooden pieces for the ears
- 4 short wooden beads or pieces of wooden dowel for the legs
- Small white, pink, and turquoise pom-poms
- Acrylic paint in cream or peach, rust brown, white, black, dark brown, turquoise, blue, and purple
- Fine detail paintbrush
- Medium soft paintbrush
- Low-temperature hot glue gun and glue sticks
- Small wood slice or flat miniature base
- Fine-grit sandpaper
- Pencil
- Paper towel
- Protective work mat
Step-by-Step Instructions
Step 1: Position the Pine Cone
Place the pine cone on its side. Use the narrower end for the sheep’s head and the fuller end for its back.
Check that the pine cone rests evenly. If necessary, carefully remove one or two loose or protruding scale tips from the underside.
Mark four evenly spaced positions for the legs.
Step 2: Prepare the Legs
Cut or select four wooden pieces of equal length. Pieces measuring approximately ¾–1¼ inches work well for a medium pine cone.
Leave the upper part natural or paint it light beige. Paint the bottom ¼ inch dark brown to create the hooves.
Set the legs aside until the paint is completely dry.
Step 3: Attach the Legs
Apply a small dot of hot glue to one of the marked positions and attach the first leg. Repeat with the remaining three legs.
Stand the pine cone on a flat surface before the glue hardens. Adjust each leg until all four hooves touch the surface and the body sits level.
Step 4: Paint the Pine Cone
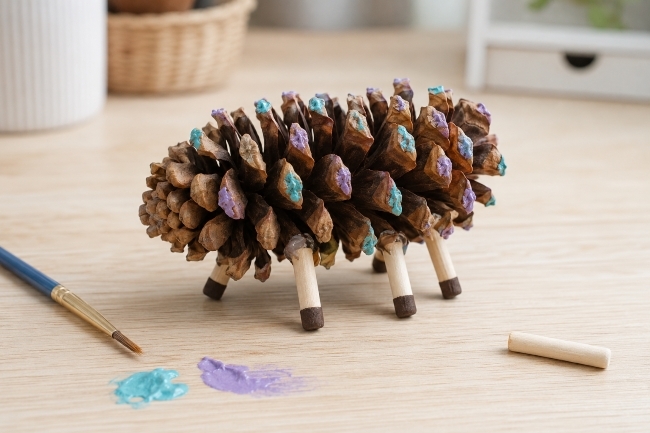
Place a small amount of blue, turquoise, or purple acrylic paint on a dry brush. Wipe most of it onto a paper towel.
Lightly brush the paint across the outer tips of the pine cone scales. Keep the color soft and uneven so that only small accents remain visible beneath the wool.
Allow the paint to dry.
Step 5: Add the Fleece
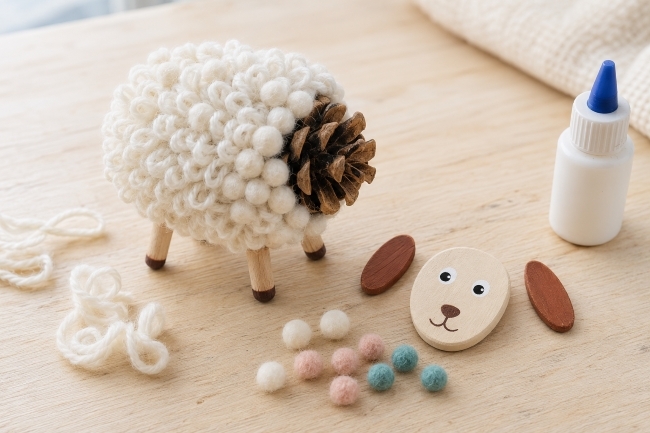
Glue white mini pom-poms or felt balls closely together across the top, sides, and back of the pine cone.
For a looped wool texture, wrap thick white yarn once around your finger. Slide off the loop, secure the crossing point with glue, and attach it to the pine cone. Continue overlapping the loops until the body looks full and fluffy.
Leave the front of the pine cone uncovered for the face. Keep the areas around the legs clear so the sheep can stand properly.
Step 6: Paint the Face
Sand the oval wooden face piece if its edges feel rough.
Paint it cream, light peach, or another soft skin tone. Once the base coat is dry, add two white eyes and small black pupils.
Paint a small nose near the center of the lower half. Add a short vertical line beneath it and finish with a gently curved mouth.
Lightly sketch the features in pencil first if needed.
Step 7: Make the Ears
Paint the two narrow oval pieces rust brown. Add a darker line or small shaded area inside each ear.
Once dry, glue one ear behind each side of the face. Angle both ears slightly downward and check them from the front before the glue sets.
Step 8: Assemble the Head
Glue the completed face to the narrow end of the pine cone. Let it overlap the edge of the white fleece slightly to conceal the attachment point.
Arrange several small pom-poms across the forehead. Use a mixture of white, pink, and turquoise, keeping them high enough that they do not cover the eyes.
Vary their size and placement slightly for a natural handmade appearance.
Step 9: Attach the Sheep to the Base
Place the sheep on the wood slice and adjust its position until it stands securely.
Mark the location of each hoof. Add a small dot of hot glue beneath every hoof, then press the sheep firmly onto the base.
Remove visible glue strings and trim any loose yarn fibers. Check that the face, ears, legs, and fleece are securely attached.
Helpful Tips
- Use small amounts of glue at hidden contact points.
- Combine slightly different pom-pom or wool-loop sizes for a more natural texture.
- Keep the face approximately one-third the height of the pine cone.
- Check the leg alignment on a flat surface while the glue is still warm.
- Avoid covering the pine cone too heavily. The body should remain small and compact.
- Keep the finished sheep away from moisture and direct heat.
- Hot glue should be handled by an adult.