How to Make a Colorful Pinecone Gnome
A simple pinecone, a little paint, and a piece of colorful faux fur become an adorable handmade gnome.
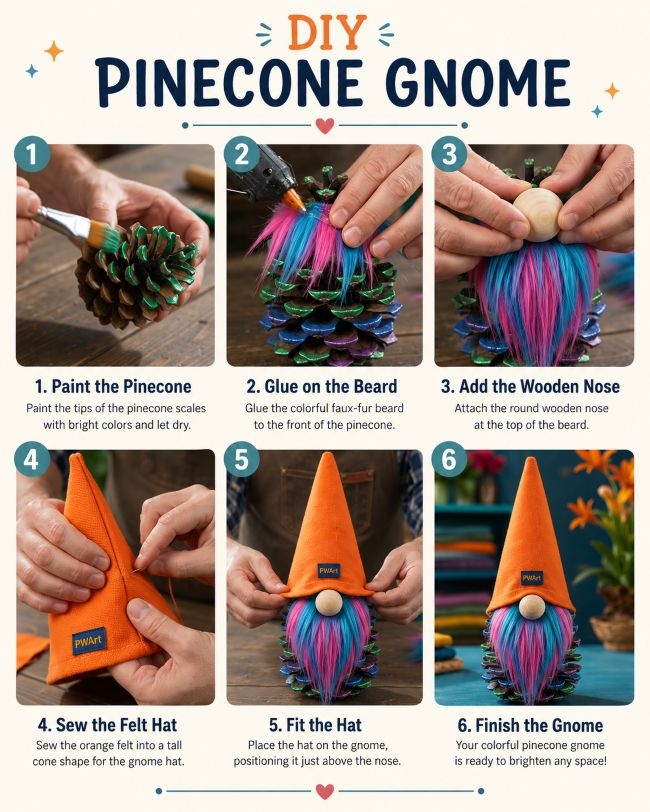
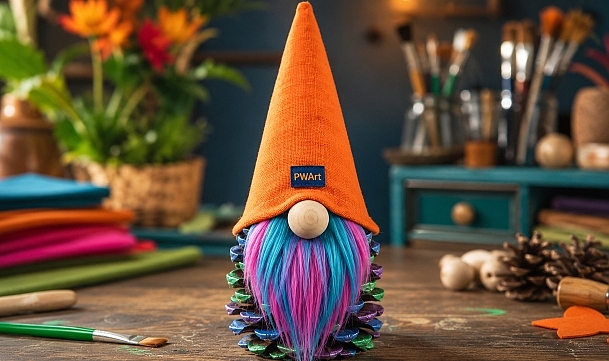
This playful nature craft turns an ordinary pinecone into a bright decorative character. The pinecone forms the textured body, while painted scale tips add flashes of green, blue, and purple. A long multicolored faux-fur beard, smooth wooden nose, and tall orange felt hat complete the gnome’s cheerful appearance.
The project requires only a few basic materials and can be adapted to almost any medium or large pinecone.
Materials You Will Need
- One large, open pinecone
- Acrylic paint in green, blue, and purple
- Optional pearlescent or metallic acrylic paint
- Small flat paintbrush
- Multicolored long-pile faux fur
- One unfinished wooden bead or wooden ball
- Orange felt or medium-weight craft fabric
- Orange sewing thread
- Hand-sewing needle
- Hot glue gun and glue sticks
- Fabric scissors
- Craft knife or small precision scissors
- Paper and pencil for the hat pattern
- Optional small woven label
- Optional clear matte sealer
Suggested Measurements
Adapt the dimensions to your pinecone rather than treating them as fixed measurements.
For a pinecone measuring approximately 10–13 cm tall:
- Wooden nose: 25–35 mm wide
- Faux-fur beard: approximately 9–12 cm wide and 10–15 cm long
- Finished hat height: approximately 16–22 cm
- Hat opening: wide enough to fit over the top third of the pinecone
A useful rule is to make the hat roughly one and a half times the height of the pinecone. The beard should extend from beneath the nose to slightly below the bottom of the pinecone.
Step 1: Select and Clean the Pinecone
Choose a pinecone with open, evenly spaced scales. A cone that stands upright on its wider end will be easier to display.
Remove loose dirt with a dry brush. Shake the pinecone gently to dislodge dust and small debris.
When using a pinecone collected outdoors, allow it to dry completely before crafting. Check that there are no insects or damp areas trapped between the scales.
Do not wash it immediately before beginning, since moisture can cause the scales to close.
Step 2: Decide Which Side Will Be the Front
Stand the pinecone upright and rotate it until you find the most attractive side.
The front should have:
- Enough open space for the beard
- A stable area near the top for the wooden nose
- A balanced arrangement of scales on both sides
- A relatively flat bottom
Mark the back lightly with a pencil or a small removable piece of tape. This will help maintain the correct orientation while painting and assembling the gnome.
Step 3: Paint the Pinecone Scales
The video keeps most of the natural brown pinecone visible while adding color mainly to the outer portions of the scales.
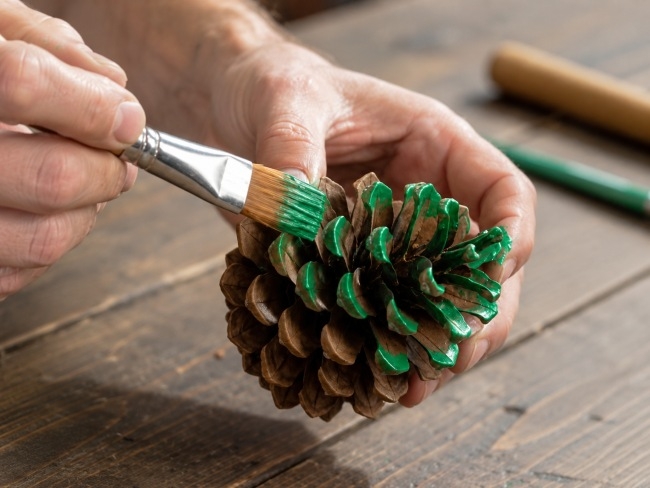
Load a small flat brush with green acrylic paint. Remove excess paint on the edge of the palette, then brush across the raised tips of selected scales.
Continue with blue and purple paint on the lower and side sections. Rather than painting every scale the same color, distribute the shades in loose groups to create a layered appearance.
For a result similar to the video:
- Use green around the upper and middle scales
- Add blue to several lower and side scales
- Place purple between the blue sections
- Leave parts of the natural brown surface visible
Use the side of the brush to follow the curved edge of each scale. This creates a cleaner line than pushing the brush deep into the pinecone.
Let the first coat dry. Add a second coat only where the color appears too transparent.
Step 4: Add Optional Highlights
The colored scale tips in the video have a slightly polished, reflective appearance.
To recreate that effect, lightly dry-brush the outer edges with pearlescent paint or a lighter version of the main color.
Do not cover the entire painted section. A narrow highlight along the edge is enough to emphasize the layered pinecone texture.
Set the pinecone aside until all paint is completely dry.
Step 5: Cut the Faux-Fur Beard
Place the faux fur with the backing facing upward. Make sure the fur pile runs downward toward the future point of the beard.
Draw a beard shape on the backing. The top should be wide enough to sit across the front of the pinecone, while the bottom can taper into a soft point.
Cut through the fabric backing with a craft knife or the tips of small scissors. Avoid cutting directly through the long fibers, since this can leave the beard looking blunt and uneven.
After cutting, gently pull away loose fibers along the edges.
The video uses a dramatic mixture of turquoise, bright blue, pink, and purple. A long-pile fur works best because it covers the front of the pinecone and creates the recognizable gnome silhouette.
Step 6: Test the Beard Placement
Hold the beard against the front of the painted pinecone before applying glue.
The upper edge should sit near the upper third of the cone. The fur should flow downward and cover most of the central front section, while the colored scales remain visible along both sides.
Check that the beard:
- Hangs straight
- Is centered on the pinecone
- Extends below the body
- Leaves space for the wooden nose
- Does not completely hide the painted side scales
Trim the backing when necessary, but leave the long fur fibers intact.
Step 7: Glue the Beard to the Pinecone
Apply hot glue in small sections along the upper backing of the beard.
Press the backing into the gaps between the pinecone scales. Work from the center toward the sides so the beard remains level.
Avoid spreading hot glue directly across the visible fur. Glue trapped in the fibers will create hard, shiny patches.
Hold the beard in place until the adhesive begins to set. Add small amounts of glue behind the side edges when extra support is needed.
Comb the fur downward with your fingers after the glue cools.
Step 8: Attach the Wooden Nose
Place the unfinished wooden bead at the upper center of the beard.
The nose should overlap the top edge of the fur and sit directly beneath the future hat. In the video, the wooden ball remains natural and unpainted, creating contrast against the bright beard.
Apply a generous but controlled dot of hot glue to the back of the wooden ball.
Press it against the pinecone and beard junction. Hold it firmly until stable.
Check the gnome from the front to make sure the nose is centered. Once the glue hardens, repositioning it may damage the fur.
Step 9: Create the Hat Pattern
Wrap a piece of paper around the upper part of the pinecone to estimate the required hat opening.
Draw a tall triangular pattern. The base of the triangle will become the lower opening of the hat, and the two long sides will form the back seam.
Add approximately 1 cm to one side for overlap and stitching.
Before cutting the felt, roll the paper pattern into a cone and test it over the pinecone. The hat should:
- Slide over the top of the pinecone
- Rest just above the wooden nose
- Cover the upper edge of the beard
- Remain tall and narrow
- Fit without crushing the pinecone scales
Adjust the pattern until the fit is correct.
Step 10: Cut the Orange Felt
Place the paper pattern on the orange felt and trace around it.
Cut the felt cleanly with sharp fabric scissors. Keep the long edges straight so they meet neatly when the cone is formed.
The material in the video has enough body to hold a pointed shape without appearing stiff. Medium-weight felt, wool felt, canvas-backed felt, or lightly structured craft fabric can produce a similar result.
Step 11: Form and Stitch the Hat
Bring the two long sides of the felt triangle together to create a tall cone.
Overlap the edges slightly. Thread the needle with matching orange thread and knot the end.
Sew upward along the seam using small whip stitches or neat overcast stitches. Keep the stitch spacing consistent.
Test the hat on the pinecone before closing the final few centimeters. This makes it easier to adjust the opening if it is too tight or loose.
Secure the thread at the top and trim the excess.
The seam should be positioned at the back when the hat is placed on the gnome.
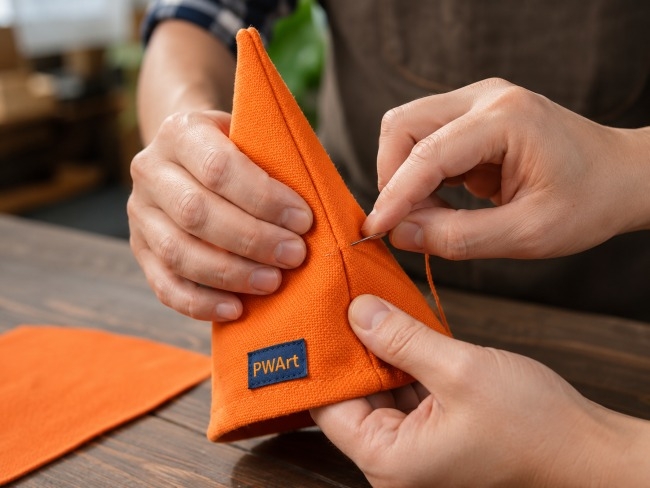
Step 12: Add an Optional Label
The video shows a small rectangular label attached near the lower front of the hat.
To add a similar detail, position a small woven or fabric label above the lower edge. Sew it by hand using thread that coordinates with the hat.
Keep the label small so it does not dominate the simple shape.
This step is decorative and can be omitted entirely.
Step 13: Fit the Hat onto the Gnome
Slide the completed hat over the top of the pinecone.
Turn the seam toward the back. Pull the front edge down until it rests directly above the wooden nose.
The sides of the hat should slightly cover the upper corners of the beard, helping to conceal the glued edge.
Adjust the hat until the point stands upright and the nose remains fully visible.
Step 14: Secure the Hat
When the hat fits firmly, it may remain in place without adhesive. For a permanent decoration, add small dots of hot glue beneath the lower edge.
Use glue at the back and along both sides rather than across the entire opening. This keeps the hat removable during final adjustments and prevents excess glue from reaching the beard.
Press the felt gently against the pinecone until secure.
Step 15: Shape the Beard
Separate and smooth the colored fibers with your fingers.
Pull several longer blue, turquoise, pink, and purple strands toward the center to create a naturally blended beard. Do not trim the beard into a perfectly straight line.
The slightly uneven lower point visible in the video contributes to the handmade character.
Use the tip of a comb or needle to release any fibers caught beneath the nose or hat.
Step 16: Make the Final Adjustments
Stand the gnome on a level surface and inspect it from every angle.
Confirm that:
- The pinecone stands securely
- The nose is centered
- The hat seam faces backward
- The beard hangs vertically
- The colored pinecone scales remain visible
- No hot-glue strings are present
- The hat point is straight
Remove glue strings with tweezers and touch up any chipped paint.
A light coat of matte sealer can be applied to the painted pinecone scales. Shield the fur, nose, and felt hat while spraying.
Helpful Crafting Tips
Preserve the Pinecone Texture
Paint only the raised scale surfaces. Leaving natural brown sections visible keeps the pinecone recognizable and adds more depth than a fully painted body.
Cut Faux Fur from the Back
Cutting from the fabric backing protects the long fibers. Slide the blade beneath the pile instead of cutting through the hair from the front.
Attach the Beard Before the Nose
The wooden ball conceals the upper edge of the beard and helps lock the fur in place. Attaching the nose first would make it harder to position the beard cleanly.
Test the Hat Frequently
Felt does not stretch much. Check the cone on the pinecone before completing the seam to avoid making the opening too narrow.
Use Hot Glue Carefully
Pinecone scales have irregular gaps and may require more glue than flat craft surfaces. Apply the adhesive in small sections and protect your fingers from the hot glue.
The finished project is a colorful woodland gnome with a naturally textured pinecone body, jewel-toned painted scales, a long multicolored beard, a smooth wooden nose, and a dramatic orange pointed hat.
It works well as:
- Seasonal shelf décor
- A handmade gift
- Woodland-themed decoration
- Craft-fair merchandise
- Children’s-room décor
- A colorful autumn or holiday ornament
- A nature-inspired family craft project