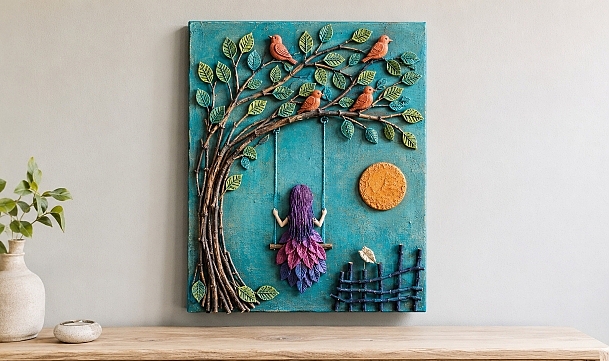
DIY Tree Branch Wall Art with a Girl on a Swing
Natural twigs, hand-shaped details, and a rich turquoise background come together in this dimensional wall panel. The curved tree frames the composition, while the swing, birds, leaves, fence, and amber sun turn it into a small story for the wall.
The finished piece works well in a bedroom, reading corner, craft room, or any space that could use a colorful handmade accent.
Skill level: Intermediate
Active time: 5–7 hours
Drying time: Varies by paint, clay, and adhesive
Finished size: Approximately 18 × 24 inches
Best for: Indoor display
Materials
For the Panel
- 1 wood panel or stretched artist’s board, approximately 18 × 24 inches
- Turquoise acrylic paint
- White, pale aqua, or light gray acrylic paint
- Matte acrylic medium or modeling paste
- 1-inch flat paintbrush
- Small palette knife or stiff brush
- Clear matte sealer
- Picture-hanging hardware
For the Tree
- 25–35 dry twigs in several lengths and thicknesses
- Additional fine branching twigs
- Dark navy acrylic paint
- Ultramarine blue acrylic paint
- Small amounts of purple, turquoise, and metallic bronze paint
- Fine floral wire or strong thread
- Heavy-duty craft adhesive
- Low-temperature hot glue gun and glue sticks
- Pruning shears or strong craft scissors
For the Leaves and Birds
- Air-dry clay or polymer clay
- Acrylic paint in orange, coral, red, green, teal, yellow, and dark blue
- Fine detail brushes
- Sculpting tool or toothpick
- Craft knife
- Optional leaf-shaped cutter
- Strong craft adhesive
For the Girl and Swing
- Air-dry clay or polymer clay
- Purple yarn
- Teal cord or tightly twisted yarn
- One straight twig for the swing seat
- Acrylic paint in skin tones, purple, magenta, blue, and dark brown
- Fine floral wire
- Strong adhesive
For the Fence, Sun, and Sign
- Several thin straight twigs
- Air-dry clay or lightweight wooden disc
- Small piece of thin wood or clay for the sign
- Amber, orange, gold, navy, and cream acrylic paint
- Black paint marker or fine liner brush
Step-by-Step Instructions
Step 1: Prepare the Background Panel
Sand the panel lightly and remove all dust. Apply one even coat of turquoise acrylic paint and allow it to dry.
For the softly plastered appearance shown here, mix a little white or pale aqua paint with matte medium or modeling paste. Spread it over the turquoise base in thin, irregular strokes using a palette knife or stiff brush.
Keep the texture subtle. The background should resemble a lightly finished wall rather than thick decorative plaster. Allow it to dry completely, then apply a second translucent turquoise coat wherever the surface needs more color.
Step 2: Plan the Composition
Place the panel vertically on a protected work surface.
Arrange the longest twigs along the lower left side. Curve them upward and toward the right to form the trunk and main canopy. The tree should create an open circular area in the lower center for the swing.
Leave room for:
- Flying birds in the upper-left corner
- A round sun on the right
- A small fence near the lower-right edge
- The girl and swing beneath the main branch
Take a reference photograph before removing the pieces. This makes it easier to rebuild the arrangement accurately.
Step 3: Clean and Paint the Twigs
Use dry, sturdy twigs without soft bark or signs of moisture. Brush away loose debris and trim the ends to fit the planned composition.
Paint the twigs dark navy. While the base coat is still slightly damp, add narrow strokes of brighter blue, purple, and turquoise. A few small bronze or natural-brown highlights will keep the branches from appearing flat.
Allow all sides to dry before assembly.
Step 4: Build the Curved Trunk
Collect several of the longest twigs into a loose bundle. Arrange the thicker ends at the lower left and gradually fan the thinner ends upward.
Secure the bundle at a few hidden points with fine floral wire or strong thread. Do not wrap every section tightly; slight spacing between the twigs gives the trunk its layered, handmade character.
Add more long twigs to the right side of the bundle to create the sweeping main branch. Test the entire tree against the panel and adjust the curve before gluing it down.
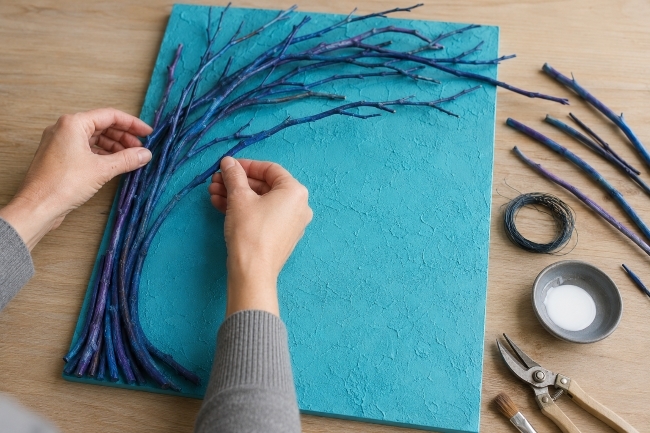
Step 5: Attach the Tree to the Panel
Apply heavy-duty craft adhesive to the main contact points on the back of the trunk. Use small amounts of hot glue to hold the twigs temporarily while the stronger adhesive cures.
Press the trunk into position, beginning at the bottom and working upward. Add the main horizontal branch, followed by the smaller branch sections.
Build the canopy gradually. Direct some branches upward and others toward the outer edges so the tree looks balanced without becoming symmetrical.
Allow the adhesive to cure with the panel lying flat.
Step 6: Make the Leaves
Flatten small pieces of clay and cut or shape them into pointed oval leaves. Press a center vein and several fine side veins into each piece with a toothpick or sculpting tool.
Make leaves in several sizes, generally between ½ and 1 inch long.
Once dry or baked according to the clay manufacturer’s instructions, paint them in layered shades of green, teal, and olive. Add dark blue veins and small yellow-green highlights.
Glue the leaves to the fine branches in singles and small clusters. Angle them in different directions to make the canopy feel natural.
Step 7: Form the Girl’s Body
Shape the torso, arms, hands, legs, and feet from clay. Keep the figure small enough to fit comfortably within the open space beneath the main branch.
Insert short pieces of fine wire into the shoulders and hips if the clay requires extra support. Position the arms so both hands can hold the swing ropes. Cross the lower legs gently at the ankles.
Allow the pieces to dry or bake fully, then paint the skin and clothing.
Because the figure is viewed from behind, facial details are unnecessary. Concentrate on a clean silhouette and a relaxed seated pose.
Step 8: Make the Layered Dress
Shape the upper part of the dress directly over the torso or create it as a separate fitted clay piece.
For the skirt, make several rows of small teardrop- or petal-shaped clay pieces. Attach them in overlapping layers, beginning at the bottom and working upward.
Paint the lower row blue, the middle row magenta, and the upper row deep pink or purple. Add darker shading near the top of each petal and lighter color along the lower edges to emphasize the layers.
Step 9: Add the Yarn Hair
Cut multiple lengths of purple yarn slightly longer than the figure’s back. Gather the strands and glue them to the top and back of the head.
Layer the yarn until the clay underneath is hidden. Trim the lower ends into a soft, uneven line around the waist.
Twist or separate a few strands to create movement and texture. Keep the hairstyle fairly narrow so it does not cover the figure’s arms.
Step 10: Assemble the Swing
Choose a straight twig for the seat and trim it to approximately 4–5 inches long. Paint it dark purple or navy and add a few lighter dry-brushed highlights.
Cut two equal lengths of teal cord. Tie or glue one cord near each end of the seat. The finished ropes should hang parallel.
Wrap the upper ends securely around the main tree branch. Reinforce each knot with a discreet drop of adhesive.
Glue the seated figure to the center of the swing. Position her hands around the ropes and secure them with small dots of adhesive. Check that the seat remains level before the glue sets.
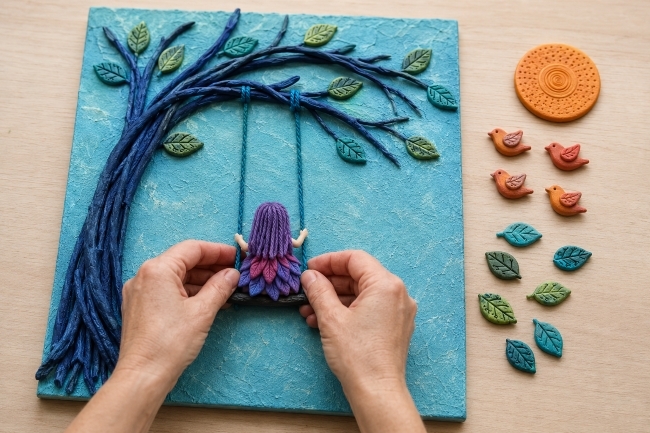
Step 11: Sculpt and Paint the Birds
Shape several small birds from clay. Give each one a rounded body, pointed beak, tail, and shallow wing details.
Create a mixture of flying and perched poses:
- Three birds flying near the upper-left corner
- One bird sitting on the upper branch
- One bird perched above the swing
After drying, paint the birds in orange and coral tones. Add red or rust shading to the wings and tails, then use cream or pale peach on the breasts. Finish with tiny dark eyes and fine feather lines.
Attach the perched birds directly to the branches. Glue the flying birds to the background, spacing them in a loose upward-moving group.
Step 12: Make the Amber Sun
Form a round, slightly irregular disc from clay, or use a lightweight wooden disc approximately 3–4 inches wide.
Create shallow swirls and dimples across the surface before the clay dries. Paint the base amber-orange, then layer gold, yellow, copper, and darker orange over the raised texture.
Add a narrow dark rim to define the shape. Glue the sun to the right side of the panel without overlapping the tree.
Step 13: Build the Lower Fence
Cut several thin twigs for the fence. Arrange four or five short vertical pieces with two or three longer horizontal rails.
Paint them in the same navy and blue palette used for the tree. Glue the fence near the lower-right edge of the composition.
Add one small upright branch behind the fence and decorate it with a few clay leaves. This detail helps connect the fence visually to the larger tree.
Step 14: Add the Small Sign
Cut a small rectangular sign from thin wood or shape it from clay. Paint it warm cream and outline the edges in dark brown or black.
Write a short name, initials, or personal message with a paint marker or fine brush. Attach the sign to the center of the fence.
Keep the lettering small so the sign remains a secondary detail rather than the focal point.
Step 15: Check the Balance and Secure Loose Parts
Stand the panel upright and inspect it from several feet away.
Check that:
- The trunk follows a smooth curve
- The swing hangs straight
- The girl sits at the center of the open space
- The birds lead the eye around the tree
- The sun balances the heavier trunk on the opposite side
- No visible glue collects around the branches or clay pieces
Reinforce any loose contact points with heavy-duty craft adhesive. Remove glue strings and touch up chipped paint.
Step 16: Seal and Hang the Panel
Cover any unpainted panel edges, then apply a light coat of clear matte sealer. Avoid saturating the yarn hair or swing ropes.
Allow the panel to dry flat for at least 24 hours. Attach picture-hanging hardware rated for the completed panel’s weight.
Hang it indoors, away from direct moisture, strong heat, and prolonged sunlight.
Practical Tips
- Dry-fit the entire tree before applying adhesive. The curved trunk determines the balance of the whole design.
- Use stronger craft adhesive for permanent attachment and hot glue only as temporary support.
- Keep the panel flat while the tree and clay pieces cure.
- Paint the twigs before gluing them to avoid staining the turquoise background.
- Make more leaves than you expect to need. Extras are useful for filling gaps after the main branches are installed.
- Use lightweight clay for the birds, leaves, and sun to reduce strain on the panel.
- If the swing tilts, adjust the rope lengths before attaching the girl.
- For a cleaner result, apply adhesive with a toothpick in small, hidden amounts.