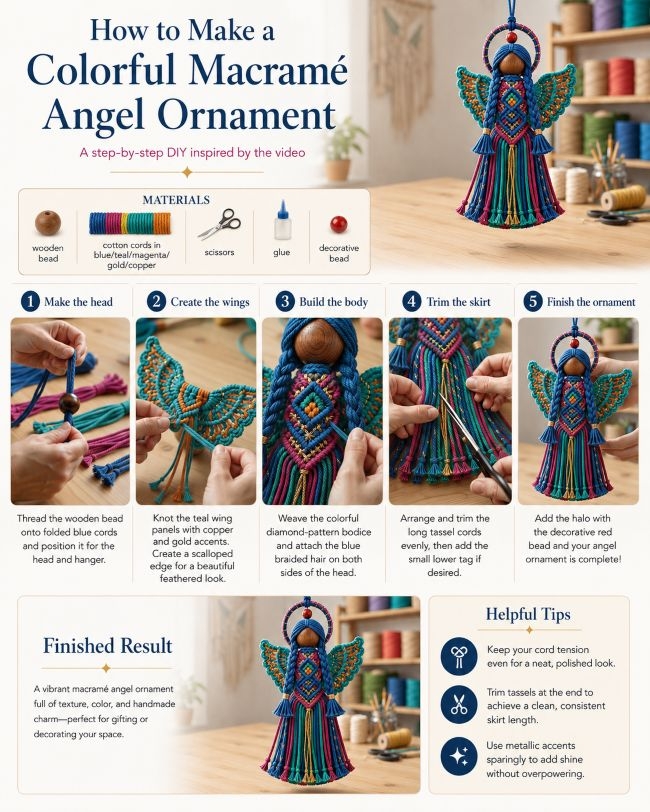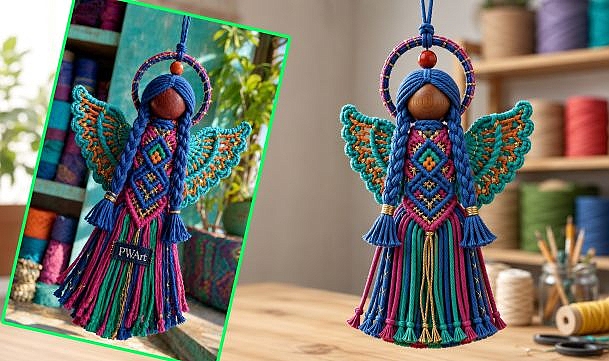
A wooden bead and a collection of colorful cotton cords are transformed into an elaborate hanging angel ornament in this striking macramé project.
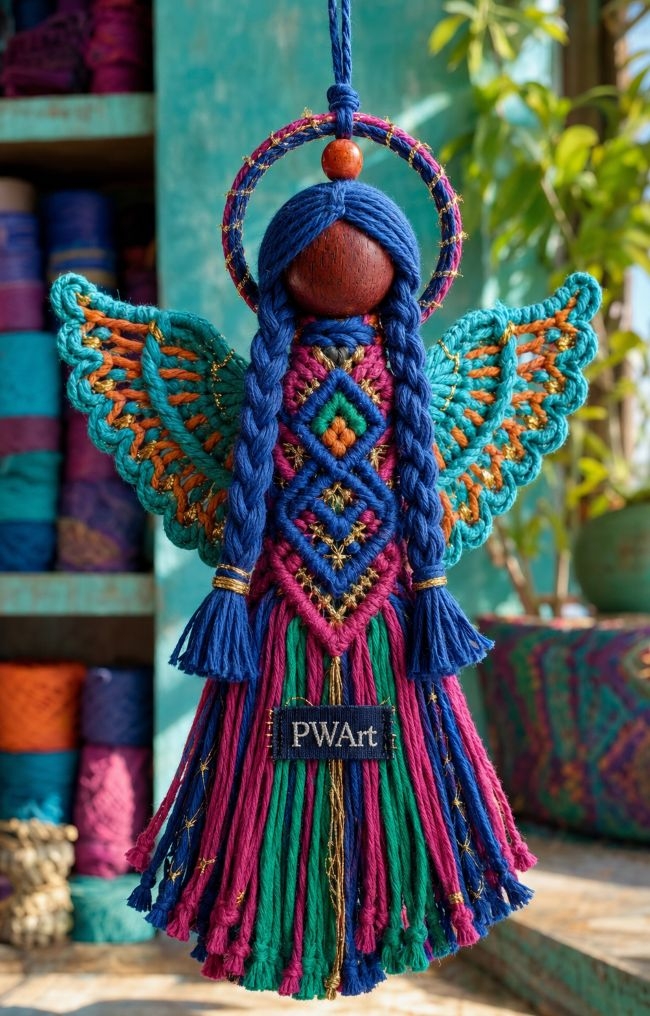
The finished design features a natural wooden bead head, thick blue braided hair, symmetrical turquoise wings, a layered geometric bodice, metallic-gold details, a multicolored tassel skirt, two red decorative beads, and a wrapped circular halo.
Although the ornament looks intricate, it becomes much easier to manage when divided into separate components. The head, wings, bodice, skirt, hair, and halo can each be prepared individually before the final assembly.
Materials You Will Need
- One wooden bead, approximately 35–45 mm wide, with a central hole
- Three- or four-millimetre cotton macramé cord in:
- Royal or navy blue
- Turquoise or teal
- Magenta
- Burnt orange or copper
- Thin metallic-gold cord
- One metal, wooden, or rigid craft ring for the halo
- One large red bead
- One small red bead
- Sharp fabric or craft scissors
- Measuring tape or ruler
- Strong clear craft glue
- Fine comb or macramé brush
- Clips, pins, or masking tape for holding the work
- Optional decorative fabric label
Approximate Cord-Cutting Guide
For an ornament measuring approximately 25–30 cm:
- Four blue cords, 100–120 cm each, for the hair and braids
- One blue cord, approximately 30 cm, for the hanging loop
- Twenty to twenty-four skirt cords, approximately 55–70 cm each
- Two long teal cords, approximately 100 cm each, for the wing outlines
- Twelve to sixteen shorter teal, orange, and gold cords for the inner wing pattern
- Eight to twelve cords, approximately 70–90 cm each, for the geometric bodice
- Several short metallic-gold cords for wrapping and decorative stitching
Cut the skirt cords slightly longer than necessary. Their final length will be corrected after the ornament has been assembled.
Step 1: Prepare and Organize the Cords
Cut all cords before beginning the assembly.
Arrange them by color and purpose so the wing cords, bodice cords, hair cords, and skirt cords remain separate. Secure the ends temporarily with small elastic bands or pieces of masking tape.
This prevents the longer strands from tangling while the individual sections are being made.
Step 2: Create the Wooden Bead Head
Fold the main blue support cords in half and pass the folded section through the hole in the wooden bead.
Pull enough cord through the top to create the central hanging structure. Secure the cords immediately beneath the bead with a firm gathering knot or wrapped knot.
The bead should remain stable and should not slide along the cords.
Keep the natural wood surface visible. In the video, the bead is left unpainted and becomes the simple, featureless face of the angel.
Step 3: Form the Blue Hair
Arrange several thick blue cords over the top of the wooden bead.
Divide the cords evenly between the left and right sides. The strands should meet neatly at the top center, creating the appearance of parted hair.
Braid each side into a thick, even braid. Maintain consistent tension so both braids have approximately the same width and length.
Wrap the lower end of each braid with metallic-gold cord. Leave the remaining blue ends loose and trim them into small tassels.
The braids should hang symmetrically on both sides of the body.
Step 4: Construct the Wing Frames
Create two mirror-image wing frames using thick teal cord.
Each wing should have:
- A defined upper curve
- A pointed or lifted outer tip
- A narrower attachment point near the center
- A scalloped decorative outer edge
Double half-hitch knots are suitable for shaping the curved outlines. A firmer core cord can also be used beneath the teal wrapping to help the wings maintain their shape.
Lay both wings side by side regularly to confirm that their size and curvature remain symmetrical.
Step 5: Weave the Interior of the Wings
Fill the interior of each teal wing with orange and metallic-gold cords.
The video shows open woven sections rather than a completely solid surface. Leave small spaces between the knots to create a light, lace-like appearance.
Use alternating diagonal knots, half hitches, or simple wrapped intersections. Repeat the same pattern on the opposite wing.
Add small gold accents sparingly. The metallic cord should highlight the turquoise and orange pattern without overpowering it.
Finish the outer edges with curved teal loops or scallops.
Step 6: Join the Wings
Place the two completed wings behind the central support cords.
Align their inner edges beneath the wooden bead and behind the upper body. Secure the wing centers tightly with teal or blue cord.
Check the ornament from the front before tightening the final knots. Both wings should rise to the same height and extend an equal distance from the body.
A small amount of clear craft glue can be applied behind the central join for additional reinforcement.
Step 7: Build the Upper Bodice
Attach the bodice cords below the wooden bead and between the two wings.
Use magenta cords to establish the outer structure. Add royal-blue cords inside the magenta border and place teal and orange details in the center.
The visible design in the video is based on stacked geometric diamond forms. These can be made with diagonal double half-hitch knots.
Construct the first diamond and place a small teal and orange motif at its center. Continue downward with additional blue and magenta borders.
Keep the cord tension consistent. Uneven tension will cause the geometric shapes to twist or lean to one side.
Step 8: Add the Gold Decorative Details
Weave thin metallic-gold cord between selected sections of the bodice.
The video uses small gold intersections, diagonal highlights, and cross-shaped details. Add these only after the main blue, teal, orange, and magenta structure is secure.
Tie or glue the metallic ends at the back so they remain hidden from the front.
The gold details should look integrated into the pattern rather than placed loosely over it.
Step 9: Attach the Skirt Cords
Attach the long skirt cords beneath the lower point of the bodice.
Alternate royal blue, teal, magenta, and metallic-gold strands across the width of the skirt. Distribute each color evenly so neither side appears visually heavier.
Use lark’s head knots or a secure wrapped attachment beneath the bodice.
Allow all cords to hang freely before tightening them. Untangle the strands and ensure that none are crossed behind the ornament.
Step 10: Shape the Skirt
Spread the cords into a wide, gently flared skirt.
Tie small overhand knots close to the bottom of selected blue, teal, magenta, and gold strands. Leave a short length beneath each knot to form a miniature tassel.
The knots should be positioned at roughly the same height, but slight variation creates a softer handmade appearance.
The video shows the skirt arranged in a rounded, fan-like silhouette rather than hanging as a narrow straight bundle.
Step 11: Trim the Skirt
Lay the angel flat on a clean surface.
Comb or straighten the cords and arrange them in their final order. Trim the lower edge gradually, following a shallow curved line.
Do not cut directly to the final length in one pass. Remove a small amount, check the symmetry, and then make the final adjustment.
Open the short ends beneath the knots with your fingers or a fine comb to create neat miniature tassels.
Step 12: Wrap the Halo
Wrap the circular halo ring with blue and magenta cord.
Add thin metallic-gold cord at regular intervals around the ring. This produces the striped, decorative effect visible in the finished ornament.
Keep the wrapping tight so the ring beneath it does not show.
Secure the final ends at the back of the halo with a small knot and clear glue.
Step 13: Add the Red Beads
Position the larger red bead above the wooden head and inside the lower portion of the halo.
Place the smaller red bead above it. Thread or secure both beads onto the central support cord.
The beads should remain vertically aligned with the center of the wooden head and the top of the bodice.
Step 14: Attach the Halo and Hanging Loop
Place the wrapped halo behind the head.
Secure its lower section to the central body structure and its upper section to the blue hanging cord. Adjust the ring until it forms an even circle around the head.
Tie a strong loop above the halo for hanging the ornament.
Test the ornament by lifting it from the loop. The angel should hang vertically without tilting to either side.
Step 15: Complete the Final Assembly
Inspect the angel from the front and back.
Make the following final corrections:
- Straighten both wings
- Align the red beads
- Reposition the braids
- Tighten loose bodice knots
- Separate tangled skirt cords
- Correct uneven tassels
- Hide visible cord ends
- Reinforce weak joins with clear glue
An optional label can be attached near the lower bodice or skirt. Keep it small so it does not cover the central macramé pattern.
Helpful Crafting Tips
Maintain Even Tension
Consistent tension is essential for symmetrical wings and clean geometric body patterns. Pull each knot firmly, but do not pull so tightly that the surrounding cords begin to curve.
Work on a Flat Surface
Tape or pin the ornament to a corkboard, foam board, or padded work surface. Stabilizing the central cords makes the decorative knots much easier to control.
Compare Both Wings Frequently
Do not complete one entire wing before checking the second. Compare them after every major row to maintain matching length, angle, and curvature.
Trim Only at the End
The skirt may change length as the bodice is tightened and the ornament is suspended. Complete the full assembly before trimming the lower cords.
Use Metallic Cord Selectively
Metallic cord is visually strong and can become difficult to knot. Use it as an accent rather than as the primary structural cord.
The completed piece is a richly textured macramé angel ornament with a warm wooden head, blue braided hair, turquoise woven wings, a multicolored geometric bodice, and a dramatic tassel skirt.
Its circular halo and red bead details give it a distinctive hanging silhouette, while the gold cord adds a refined decorative finish.
The ornament can be used as:
- Wall décor
- A seasonal hanging decoration
- A handmade gift
- A nursery or craft-room accent
- A holiday ornament
- A decorative door or window hanging