How to Knit a Little Bird's Nest pattern Sweater
Are you looking for a unique and charming
knitting project? Look no further than the
little bird's nest pattern sweater! This adorable
sweater features a textured
pattern that looks like a cozy nest for your little one. In this tutorial, we'll walk you through the steps to knit your very own
little bird's nest pattern sweater.
Materials
- Yarn - We recommend using a soft, worsted weight yarn in the color of your choice.
- Knitting needles - Size 7 or 8 circular needles, depending on your gauge.
- Tapestry needle - For weaving in ends and sewing pieces together.
- Scissors
Gauge and Sizing
Before you start knitting, it's important to determine your gauge and size. The gauge for this pattern is approximately 4 stitches and 6 rows per inch in stockinette stitch. The sizes for this pattern include 3-6 months, 6-12 months, and 12-24 months.
Instructions
Step 1: Cast on
Using your circular needles, cast on 60 (72, 84) stitches.
Step 2: Knit the ribbing
Knit in 1x1 ribbing (k1, p1) for 1 inch.
Step 3: Knit the body
Switch to stockinette stitch (knit every round) and knit for 3 (3.5, 4) inches.
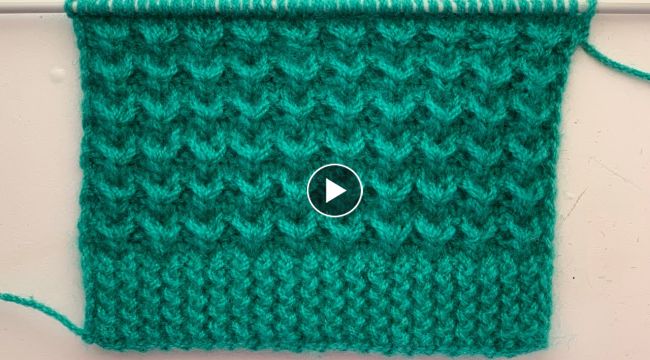
Step 4: Begin the little bird's nest pattern
Row 1: *Knit 3, purl 1* Repeat from * to * until the end of the row.Row 2: *Knit 2, purl 2* Repeat from * to * until the end of the row.Row 3: *Knit 1, purl 1, knit 1, purl 1* Repeat from * to * until the end of the row.Row 4: *Purl 2, knit 2* Repeat from * to * until the end of the row.
Repeat these four rows until you have knit a total of 6 (7, 8) inches of the little bird's nest pattern.
Step 5: Knit the body
Switch back to stockinette stitch and knit for 3 (3.5, 4) inches.
Step 6: Shape the shoulders
Row 1: Knit 16 (19, 22), bind off the next 28 (34, 40) stitches, knit to the end of the row. Row 2: Knit 16 (19, 22), cast on 28 (34, 40) stitches, knit to the end of the row. Repeat these two rows until you have 36 (40, 44) stitches remaining on each side.
Step 7: Knit the sleeves
Pick up and knit 28 (32, 36) stitches around the armhole. Knit in stockinette stitch for 3 (3.5, 4) inches. Then, decrease 1 stitch at each end of every 4th row until you have 16 (18, 20) stitches remaining. Bind off.
Step 8: Finish the sweater
To finish the little bird's nest pattern sweater, you will need to weave in any loose ends and block the sweater.
Weave in the EndsTake a tapestry needle and weave in any loose ends of yarn throughout the sweater. Be sure to weave in the ends neatly and securely, so they don't come undone with wear or washing.
BlockingBlocking is an essential step in finishing any knitted garment. It helps to even out the stitches, smooth out any lumps or bumps, and give the
sweater its final shape.
To block the little bird's nest pattern sweater, follow these steps:Fill a basin with lukewarm water and a gentle wool wash. Gently immerse the sweater in the water, making sure it is fully saturated.Let the sweater soak in the water for 10-15 minutes.Drain the water from the basin and gently press out any excess water from the sweater. Do not wring or twist the sweater, as this can damage the fibers.Lay the sweater flat on a clean towel and roll the towel up, pressing gently to remove any remaining water.Unroll the towel and lay the sweater flat on a blocking mat or a clean, dry towel.Use rust-proof T-pins to pin the sweater into its final shape. Pay particular attention to the edges and any parts of the sweater that need to be shaped.Leave the sweater to dry completely. This can take anywhere from 24 to 48 hours, depending on the humidity and air flow in the room.Once the sweater is completely dry, unpin it and it's ready to wear!Congratulations! You've completed your little bird's nest pattern sweater. With its cozy texture and cute bird-like pattern, it's sure to be a hit this season. Remember to take good care of your sweater by washing it gently and storing it carefully, and it will last you for many years to come.Happy knitting!